saving a pc hard drive to a mac
Apr 25, 23if you are anything like me you are tech support for many folks in your family. sometimes their computers die or something happens where you just need to get the data off of their computer. for me the most annoying part of this is the disk is frequently slow. there are lots of ways to solve this issue, but i usually do this by simply creating an image of the drive so that i can put the device back together and work with the data on my mac.
tldr;
- take the drive out of whatever it’s in
- plug it into your computer somehow
- open up disk utility
- right click on the drive and create image from drive
can i get a screenshot?
i don’t do this much, but i feel like i always have to go back and lookup what to do so that’s why i’m writing this. it is a very simple process, but there are some options during this process, but i usually do things this way in the end. let’s get some pictures of this process.
1. take the drive out of whatever it’s in
i don’t have a consistent screenshot for this. for me this is usually pc cases from typical brands like hp and dell. if you are doing this type of support for your family, you probably already know how to do this. if not, search youtube for something like ‘diy remove hard drive from pc’ and there are lots of videos. if you can add the brand and model, sometimes you can find something that specific. generally you are just opening the case using a screw or lever depending on how it is. finding the hard drive and unplugging it, then removing it from it’s mounting setup which could involve screws or clips or something like that. most cases today make this process relatively painless. here is a snip for this example showing the drive kind of hanging out of this case. it’s unscrewed, but still plugged in.

2. plug it into your computer somehow
i have had a ton of things to plug drives into over the years. most recently (which prompted me to write this article) i needed to plug in a larger drive, so i bought this. not an affiliate link, just a link. i like this one as it’s powered and can mount to some older pin drives, not just sata. if you have some other format you’ll need that too. hopefully if you are getting recruited to do this by your family, you already know how to hook up a drive to your own computer.
here’s a pic of plugging the drive into the reader i linked to above. that is then plugged into power, then usbc on the mac.

3. open up disk utility
i just use spotlight search (cmd+space) and type in disk utility and start it up.

you can also open finder and hit shift+cmd+u to open up utilities and select it in that folder.
4. right click on the drive and create image from drive
In this example, my drive volume is called OS. i am viewing only volumes so i don’t need to see all of the weird other things that may be on the drive. to do this, just go to view in disk util and select volumes.

I usually leave the file name as whatever default is. For the options, you can choose whichever options you want. I usually choose compressed just to make it a bit smaller. these are normally very temporary images for me, so i don’t encrypt them. if you are going to keep them for a long time or want some extra protection, you can encrypt them. my macbook drive is already encrypted so this isn’t much of a concern for me.

you’ll have to put in your password or use your fingerprint or somethign to elevate the app while it does this. then you’ll see a progress screen like this for as long as it takes depending on your drive.

It looks something like this when it’s done.

after this i eject the disk.

should be safe to unplug now, so i do that and put it back where it came from.
what next?
after this, it’s easy to just double click on the dmg file in finder, or right click and open like screenshot below. as you can see in this screenshot i actually have a couple of other disk images from some recent work where i was doing this for several other drives at once, so i named them something descriptive at that time so i could tell them apart.

the drive should open up when you double click it and you’ll have a mounted device on your desktop.

for me, i am usually either giving this to a family member that has switched to a mac to use, or i am just sitting with them and copying the files they need off. yes, i could do this as soon as i mount the drive, but a lot of times i need to take a computer to check it and this step only happens if there is something bad happening with the computer. in my most recent situation, the windows folder seemed to be corrupt, and it was a 10 year old machine. so really we just wanted to pull the data off as this machine was only used to access some old docs and there was already a newer machine to use. but this way i have the whole drive and i can just bring my laptop and a small usb drive to move data to the new machine and the old machine can just be disposed of or stored in a closet somewhere for later, just-in-case reasons.
mac vs pc
i am definitely pro pc, but for family i always recommend macs and apple products. there are plenty of walled-garden problems to have with the apple ecosystem, but for me personally it just makes my life easier. i really never have issues with any family that have apple devices, but pcs always eventually have some crazy thing happen. this is definitely user related as i do have some family with pcs that have minimal issues, but i can’t fix the users and over the course of years it is just easier to have people have macs as they generally don’t break and don’t have the same random issues. i switched all of my home devices over to macs a few years back just because it made it easier to support those folks even though i still use windows regularly for work and write a lot of powershell code. i just use powershell core on the mac. 😀
i volunteer for all of the it issues at my children’s school as well and generally recommend macs for teachers for the same reason. generally prefer to go with chromebooks for students. i think if i could get everyone to use chromebooks that would make my life even easier than the macs, but have not had much luck getting folks to stick to linux, chromeos, or chromebooks over the years vs apple products. usually for adults it’s either pc or mac.
hey… can’t i do this from the command line?
yes, you can. i generally do not just because this is pretty quick to do in the ui, but if you wanted to, you have to do a couple of things. so i’ll take a couple more screenshots.
find volume we want
i already have my view in disk util set to volumes, so this is automatic in ui, but for cli you need to look by using diskutil list and look at the output. it will show any/all disk info on your system, but usually you can easily find the new drive because it will be marked as external like below.
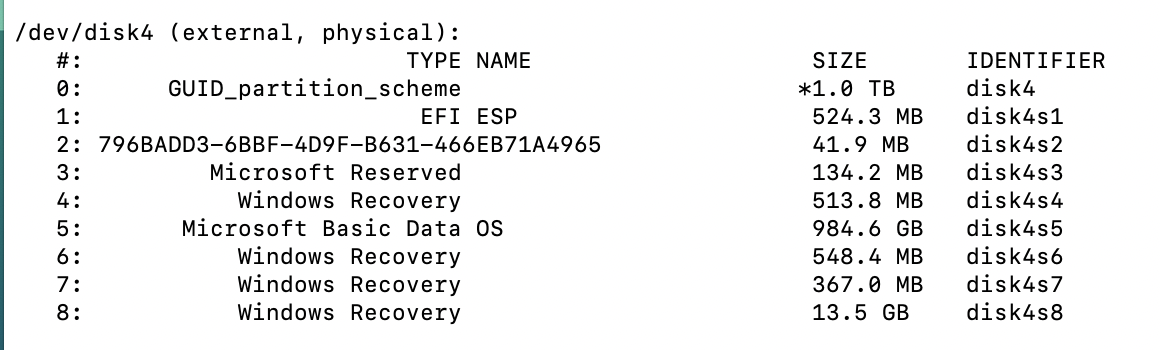
image the volume
in our case, we just want the windows os partition, not any of the recovery partitions etc. so we image it like below. you’ll get a password popup.

next we eject and unplug the drive and we’re done.
if you want to mount it, you can mount it using same command like below.

and just open it with open path/to/volume like below.

when you are done, you can just eject the whole disk like below.

example of all of these commands:
#without comments
diskutil list
hdiutil create -srcdevice /dev/disk4s5 -format UDZO -o ~/Downloads/cli_os.dmg
hdiutil attach ~/Downloads/cli_os.dmg
open /Volumes/OS
hdiutil detach /dev/disk4

# with comments

#without comments

# find volume to mount
diskutil list
# create image of volume to a file
hdiutil create -srcdevice /dev/disk4s5 -format UDZO -o ~/Downloads/cli_os.dmg
# can disconnect physical drive here, then attach to the image
hdiutil attach ~/Downloads/cli_os.dmg
# open it an do whatever you want
open /Volumes/OS
# detatch the disk for this volume
hdiutil detach /dev/disk4

#once images, you can just do these steps when you want to work with it from cli
hdiutil attach ~/Downloads/cli_os.dmg #attach
open /Volumes/OS # or do whatever you want...
hdiutil detach /dev/disk4 #detach